本文通过 Go 语言写几个简单的通信示例,从 TCP 服务器过渡到 HTTP 开发,从而简单介绍 net 包的运用。
TCP 服务器
首先来看一个 TCP 服务器例子
tcp-write/main.go 1 2 3 4 5 6 7 8 9 10 11 12 13 14 15 16 17 18 19 20 21 22 23 24 25 26 27 28 29 30 31 32 33 34 35 package mainimport ( "fmt" "log" "net" ) func main () li, err := net.Listen("tcp" , ":8080" ) if err != nil { log.Panic(err) } defer li.Close() for { conn, err := li.Accept() if err != nil { log.Println(err) } fmt.Fprintln(conn, "Hello from TCP server" ) conn.Close() } }
在对应的文件夹下启动服务器
模拟客户端程序发出请求,这里使用 netcat 工具,也就是 nc 命令。
1
2
$ nc localhost 8080 Hello from TCP server
通过 net 包,我们可以很简单的去写一个 TCP 服务器,代码可读性强。
TCP 客户端
那么我们能不能用 Go 语言来模拟客户端,从而连接前面的服务器呢?答案是肯定的。
tcp-read/main.go 1 2 3 4 5 6 7 8 9 10 11 12 13 14 15 16 17 18 19 20 21 22 23 24 25 package main import ( "fmt" "io/ioutil" "log" "net" ) func main () conn, err := net.Dial("tcp" , ":8080" ) if err != nil { log.Fatal(err) } defer conn.Close() byte , err := ioutil.ReadAll(conn) if err != nil { log.Println(err) } fmt.Println(string (byte )) }
运行服务器后,再在所在的文件夹下启动客户端,会看到来自服务器的问候。
1
2
$ go run main.go Hello from TCP server
TCP 协议模拟 HTTP 请求
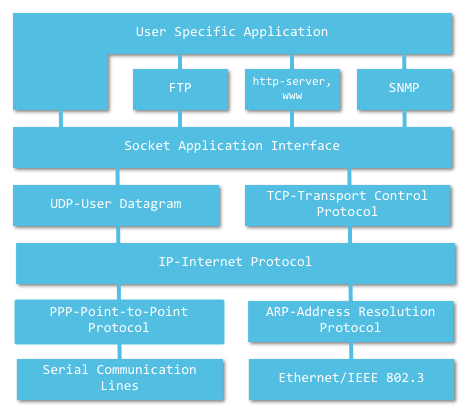
我们知道 TCP/IP 协议是传输层协议,主要解决的是数据如何在网络中传输。而 HTTP 是应用层协议,主要解决的是如何包装这些数据。
下面的七层网络协议图也能看到 HTTP 协议是处于 TCP 的上层,也就是说,HTTP 使用 TCP 来传输其报文数据。
现在我们写一个基于 TCP 协议的服务器,并能模拟。在这其中,我们需要模拟发送 HTTP 响应头信息,我们可以用 curl -i 命令先来查看一下其他网站的响应头信息。
1
2
3
4
5
6
7
8
9
10
11
12
13
14
$ curl -i "www.baidu.com" HTTP/1.1 200 OK Server: bfe/1.0.8.18 Date: Sat, 29 Apr 2017 07:30:33 GMT Content-Type: text/html Content-Length: 277 Last-Modified: Mon, 13 Jun 2016 02:50:23 GMT ... Accept-Ranges: bytes <!DOCTYPE html> <!--STATUS OK--><html> ... </body> </html>
接下来,我们尝试写出能输出对应格式响应内容的服务器。
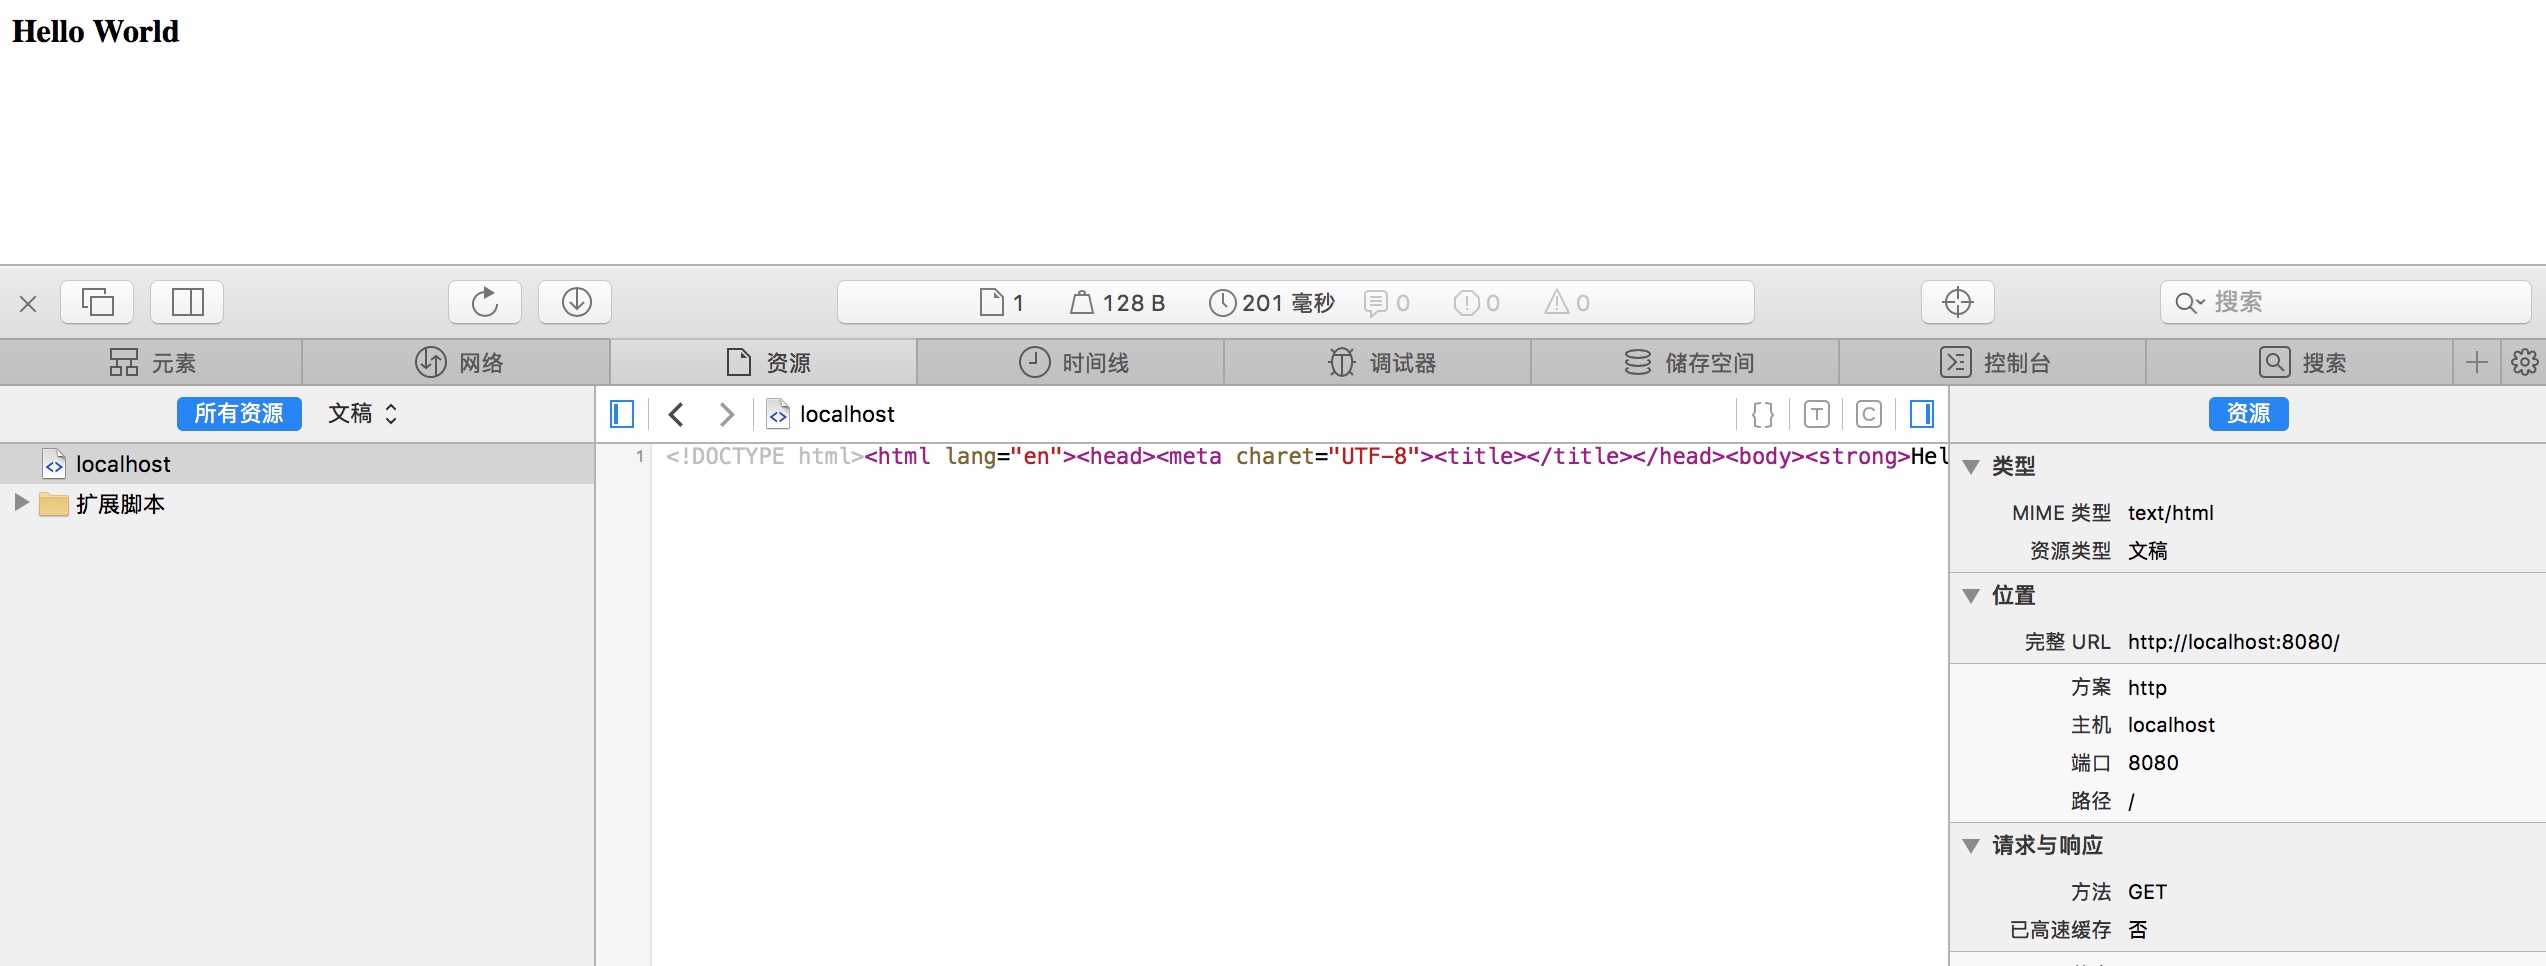
tcp-server-for-http/main.go 1 2 3 4 5 6 7 8 9 10 11 12 13 14 15 16 17 18 19 20 21 22 23 24 25 26 27 28 29 30 31 32 33 34 35 36 37 38 39 40 41 42 43 44 45 package mainimport ( "fmt" "log" "net" ) func main () li, err := net.Listen("tcp" , ":8080" ) if err != nil { log.Fatalln(err.Error()) } defer li.Close() for { conn, err := li.Accept() if err != nil { log.Fatalln(err.Error()) continue } go handle(conn) } } func handle (conn net.Conn) defer conn.Close() respond(conn) } func respond (conn net.Conn) body := `<!DOCTYPE html><html lang="en"><head><meta charet="UTF-8"><title>Go example</title></head><body><strong>Hello World</strong></body></html>` fmt.Fprint(conn, "HTTP/1.1 200 OK\r\n" ) fmt.Fprintf(conn, "Content-Length: %d\r\n" , len (body)) fmt.Fprint(conn, "Content-Type: text/html\r\n" ) fmt.Fprint(conn, "\r\n" ) fmt.Fprint(conn, body) }
go run main.go 启动服务器之后,跳转到 localhost:8080 ,就能看到网页内容,并且用开发者工具能看到其请求头。
最简单的 HTTP 服务器
几行代码就能实现一个最简单的 HTTP 服务器。
simple-http/main.go 1 2 3 4 5 6 7 package mainimport "net/http" func main () http.ListenAndServe(":8080" , nil ) }
打开后会发现显示「404 page not found」,这说明 HTTP 已经开始服务了!
ListenAndServe
Go 是通过一个函数 ListenAndServe 来处理这些事情的,这个底层其实这样处理的:初始化一个server 对象,然后调用了 net.Listen(“tcp”, addr),也就是底层用 TCP 协议搭建了一个服务,然后监控我们设置的端口。
《Build web application with golang》 astaxie 前面我们已经对 TCP 服务器有点熟悉了,而 HTTP 使用 TCP 来传输其报文数据,接下来看看如何用 net/http 包来实现在其上的 HTTP 层。
查文档可以发现 http 包下的 ListenAndServe 函数第一个参数是地址,而第二个是 Handler 类型的参数,我们想要显示内容就要在第二个参数下功夫。
ListenAndServe link 1 func ListenAndServe (addr string , handler Handler) error
再次查文档,得知 Handler 是一个接口,也就是说只要我们给某一个类型创建 ServeHTTP(ResponseWriter, *Request) 方法,就能符合接口的要求,也就实现了接口。
http.Handler link 1 2 3 type Handler interface { ServeHTTP(ResponseWriter, *Request) }
servehttp/main.go 1 2 3 4 5 6 7 8 9 10 11 12 13 14 15 16 17 18 package mainimport ( "fmt" "net/http" ) type foo struct {}func (f foo) fmt.Fprintln(w, "Implement the Handle interface." ) } func main () var f foo http.ListenAndServe(":8080" ,f) }
运行代码后打开能看到输出的字符串。
*http.Request
上面我们实现的小服务器里,我们无论访问 localhost:8080 还是 localhost:8080/foo 都是一样的页面,这说明我们之前设定的是默认的页面,还没有为特定的路由(route)设置内容。
路由这些信息实际上就存在 ServeHTTP 函数的第二个参数 *http.Request 中, *http.Request 存放着客户端发送至服务器的请求信息,例如请求链接、请求方法、响应头、消息体等等。
现在我们可以把上面的代码改造一下。
serveHTTP/main.go 1 2 3 4 5 6 7 8 9 10 11 12 13 14 15 16 17 18 19 20 21 22 23 24 25 package mainimport ( "fmt" "net/http" ) type foo struct {}func (f foo) switch r.URL.Path { case "/boy" : fmt.Fprintln(w, "I love you!!!" ) case "/girl" : fmt.Fprintln(w, "hehe." ) default : fmt.Fprintln(w, "Men would stop talking and women would shed tears when they see this." ) } func main () var f foo http.ListenAndServe(":8080" ,f) }
再优雅一点
我们可以用 HTTP 请求多路复用器(HTTP request multiplexer) 来实现分发路由,而http.NewServeMux() 返回的 *ServeMux 对象就能实现这样的功能。下面是 *ServeMux 的部分源码,能看到通过 *ServeMux 就能为每一个路由设置单独的一个 handler 了,简单地说就是不同的内容。
ServeMux link 1 2 3 4 5 6 7 8 9 10 11 12 13 14 15 type ServeMux struct { mu sync.RWMutex m map [string ]muxEntry hosts bool } type muxEntry struct { explicit bool h Handler pattern string } type Handler interface { ServeHTTP(ResponseWriter, *Request) }
用 *ServeMux 来写一个例子。
newServeMux/main.go 1 2 3 4 5 6 7 8 9 10 11 12 13 14 15 16 17 18 19 20 21 22 23 24 25 26 27 28 29 30 31 32 33 34 35 36 37 package mainimport ( "fmt" "net/http" ) type boy struct {}func (b boy) fmt.Fprintln(w, "I love you!!!" ) } type girl struct {}func (g girl) fmt.Fprintln(w, "hehe." ) } type foo struct {}func (f foo) fmt.Fprintln(w, "Men would stop talking and women would shed tears when they see this." ) } func main () var b boy var g girl var f foo mux := http.NewServeMux() mux.Handle("/boy/" , b) mux.Handle("/girl/" , g) mux.Handle("/" , f) http.ListenAndServe(":8080" , mux) }
这样就能为每一个路由设置单独的页面了。
再再优雅一点
http.Handle(pattern string, handler Handler) 还能帮我们简化代码,它默认创建一个 DefaultServeMux,也就是默认的 ServeMux 来存 handler 信息,这样就不需要 http.NewServeMux() 函数了。这看起来虽然没有什么少写多少代码,但是这是下一个更加优雅方法的转折点。
defaultServeMux/main.go 1 2 3 4 5 6 7 8 9 10 11 12 13 14 15 16 17 18 19 20 21 22 23 24 25 26 27 28 29 30 31 32 33 34 35 package mainimport ( "fmt" "net/http" ) type boy struct {}func (b boy) fmt.Fprintln(w, "I love you!!!" ) } type girl struct {}func (g girl) fmt.Fprintln(w, "hehe." ) } type foo struct {}func (f foo) fmt.Fprintln(w, "Men would stop talking and women would shed tears when they see this." ) } func main () var b boy var g girl var f foo http.Handle("/boy/" , b) http.Handle("/girl/" , g) http.Handle("/" , f) http.ListenAndServe(":8080" , nil ) }
再再再优雅一点
http.HandleFunc(pattern string, handler func(ResponseWriter, *Request)) 可以看做 http.Handle(pattern string, handler Handler) 的一种包装。前者的第二个参数变成了一个函数,这样我们就不用多次新建对象,再为对象实现 ServeHTTP() 方法来实现不同的 handler 了。下面是 http.HandleFun() 的部分源码。
http.HandleFun() link 1 2 3 4 5 6 7 8 9 func HandleFunc (pattern string , handler func (ResponseWriter, *Request) DefaultServeMux.HandleFunc(pattern, handler) } func (mux *ServeMux) string , handler func (ResponseWriter, *Request) mux.Handle(pattern, HandlerFunc(handler)) }
用 http.HandleFun() 来重写之前的例子。
handleFun/main.go 1 2 3 4 5 6 7 8 9 10 11 12 13 14 15 16 17 18 19 20 21 22 23 24 25 package mainimport ( "fmt" "net/http" ) func boy (w http.ResponseWriter, r *http.Request) fmt.Fprintln(w, "I love you!!!" ) } func girl (w http.ResponseWriter, r *http.Request) fmt.Fprintln(w, "hehe." ) } func foo (w http.ResponseWriter, r *http.Request) fmt.Fprintln(w, "Men would stop talking and women would shed tears when they see this." ) } func main () http.HandleFunc("/boy/" , boy) http.HandleFunc("/girl/" , girl) http.HandleFunc("/" , foo) http.ListenAndServe(":8080" , nil ) }
HandlerFunc
另外,http 包里面还定义了一个类型 http.HandlerFunc,该类型默认实现 Handler 接口,我们可以通过 HandlerFunc(foo) 的方式来实现类型强转,使 foo 也实现了 Handler 接口。
HandlerFunc link 1 2 3 4 5 6 type HandlerFunc func (ResponseWriter, *Request) func (f HandlerFunc) f(w, r) }
handleFun/main.go 1 2 3 4 5 6 7 8 9 10 11 12 13 14 15 16 17 18 19 20 21 22 23 24 25 26 27 package mainimport ( "fmt" "net/http" ) func boy (w http.ResponseWriter, r *http.Request) fmt.Fprintln(w, "I love you!!!" ) } func girl (w http.ResponseWriter, r *http.Request) fmt.Fprintln(w, "hehe." ) } func foo (w http.ResponseWriter, r *http.Request) fmt.Fprintln(w, "Men would stop talking and women would shed tears when they see this." ) } func main () http.Handle("/boy/" , http.HandlerFunc(boy)) http.Handle("/girl/" , http.HandlerFunc(girl)) http.Handle("/" , http.HandlerFunc(foo)) http.ListenAndServe(":8080" , nil ) }
结尾
本文从搭建 TCP 服务器一步步到搭建 HTTP 服务器,展示了 Go 语言网络库的强大,我认为 Go 语言是熟悉网络协议的一个很好的工具。自己从熟悉了拥有各种 feature 的 Swift 语言之后再入门到看似平凡无奇的 Go 语言,经历了从为语言的平庸感到惊讶不解到为其遵循规范和良好的工业语言设计而感到惊叹和兴奋的转变。
最后希望本文能为有基础的同学理清思路,也能吸引更多同学来学习这门优秀的语言。


 wechat
 alipay