Core Data 应该被当成一个对象图管理系统来正确使用,得益于其内建的缓存和对象管理机制,它在很多方面比其他数据库实际上反而更快。抽象级别更高的 API 可以让你专注于优化 APP 里关键部分的性能,而不是从头一开始来实现如何持久化。
本文为《Core Data by Tutorials》笔记上篇,代码用 swift 3 编写。等这系列写完会根据 ObjC 的《Core Data》 补充笔记,另外也推荐斯坦福课程 Developing iOS 9 Apps with Swift 中的第十课《Core Data》,用来大致地学习下 Core Data 重要的知识点,本文也有部分笔记参考了这课程。
下面的代码只给其中关键部分,请指教。由于笔记是给自己看的,部分地方可能会跳跃性比较大。
入门
Core Data 是 Apple 为 iOS、OS X、watchOS 和 tvOS 而设计的对象图管理(object graph management)和数据持久化框架。
entity 是 Core Data 中的类定义,也称为「实体」。例如一个雇员或一个公司。在一个关系型数据库中,一个 entity 类似于一张表。attribute 是跟一个特定 entity 相关的一系列信息,例如一个 Employee entity 可以有属性如:雇员的名字,地址和薪水。在一个数据库中,一个 attribute 类似于一个表中特定的 field。relationship 是很多 entities 之间的连接,也称为「关系」。在 Core Data 中,两个 entities 之间的关系叫做一对一关系 ,一个和多个 entities 之间则称为一对多关系 。例如,一个管理者和一组雇员可以有一个一对多关系 ,然而一个单独的雇员与他的上司会有一个一对一关系 。
保存数据
1
2
3
4
5
6
7
8
9
10
11
12
13
14
15
16
17
18
19
20
21
22
23
24
func save (name : String ) { guard let appDelegate = UIApplication .shared.delegate as? AppDelegate else { return } let managedContext = appDelegate.persistentContainer.viewContext let entity = NSEntityDescription .entity(forEntityName: "Person" , in: managedContext)! let person = NSManagedObject (entity: entity, insertInto: managedContext) person.setValue(name, forKey: "name" ) do { try managedContext.save() people.append(person) } catch let error as NSError { print ("Could not save. \(error) , \(error.userInfo) " ) } }
从 Core Data 中保存或恢复数据之前,都要用到NSManagedObjectContext。managed object context 就像一个内存「暂存器」用来处理 managed objects。
把一个新的 managed object 加进一个 managed object context,如果满意这些修改,我们可以直接在 managed object context 中「commit」 这些修改然后保存起来。
创建一个新的 managedObject 然后保存到 context 中。
保存键值对。
commit 改动。
1 2 3 4 5 6 7 8 9 10 11 12 13 14 let bowtie = NSEntityDescription .insertNewObject(forEntityName: "Bowtie" , into: self .persistentContainer.viewContext) as! Bowtie bowtie.name = "My bow tie" bowtie.lastWorn = NSDate () do { let request = NSFetchRequest <Bowtie >(entityName: "Bowtie" ) let ties = try self .persistentContainer.viewContext.fetch(request) let sample = ties.first print ("Name: \(sample? .name) , Worn: \(sample? .lastWorn) " ) } catch let error as NSError { print ("Fetching error: \(error) , \(error.userInfo) " ) }
提取数据
1 2 3 4 5 6 7 8 9 10 11 12 13 14 15 16 17 18 19 20 21 override func viewWillAppear (_ animated : Bool ) { super .viewWillAppear(animated) guard let appDelegate = UIApplication .shared.delegate as? AppDelegate else { return } let managedContext = appDelegate.persistentContainer.viewContext let fetchRequest = NSFetchRequest <NSManagedObject >(entityName: "Person" ) do { people = try managedContext.fetch(fetchRequest) } catch let error as NSError { print ("Could not fetch. \(error) , \(error.userInfo) " ) } }
NSManagedObject 子类
之前通过获取应用 delegate 的 managed object context 来获得访问权限,现在可以把 managed object context 当做一个属性在类和类之间传送。
传递 viewContext
AppDelegate.swift
1
2
3
4
5
6
7
8
9
10
11
var window: UIWindow ?func application (_ application : UIApplication , didFinishLaunchingWithOptions launchOptions : [UIApplicationLaunchOptionsKey : Any ]? ) -> Bool { guard let vc = window? .rootViewController as? ViewController else { return true } vc.managedContext = persistentContainer.viewContext return true }
搜索
ViewController.swift
1
2
3
4
5
6
7
8
9
10
11
12
13
14
15
16
17
18
19
20
21
22
23
24
var managedContext: NSManagedObjectContext !override func viewDidLoad () { super .viewDidLoad() insertSampleData() let request = NSFetchRequest <Bowtie >(entityName: "Bowtie" ) let firstTitle = segmentedControl.titleForSegment(at: 0 )! request.predicate = NSPredicate (format: "searchKey == %@" , firstTitle) do { let results = try managedContext.fetch(request) populate(bowtie: results.first! ) } catch let error as NSError { print ("Counld not fetch \(error) , \(error.userInfo) " ) } }
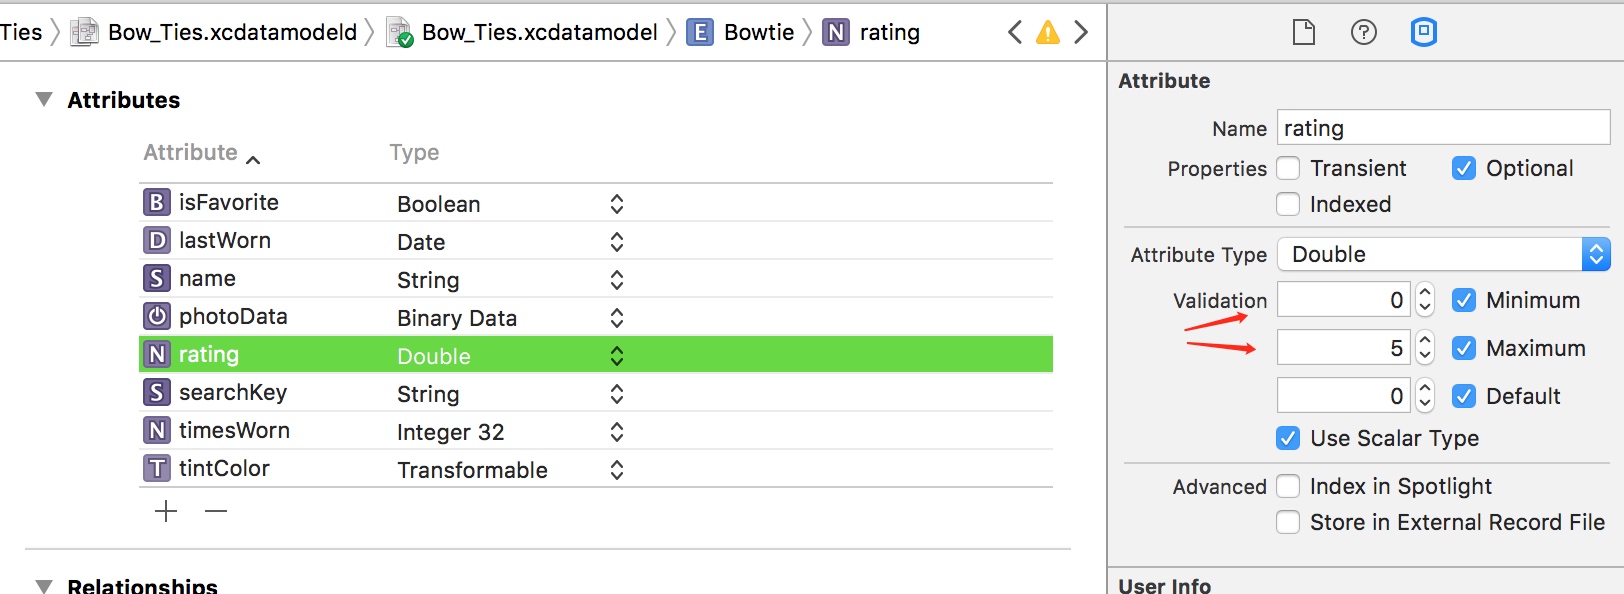
校验数据
Core Data Stack
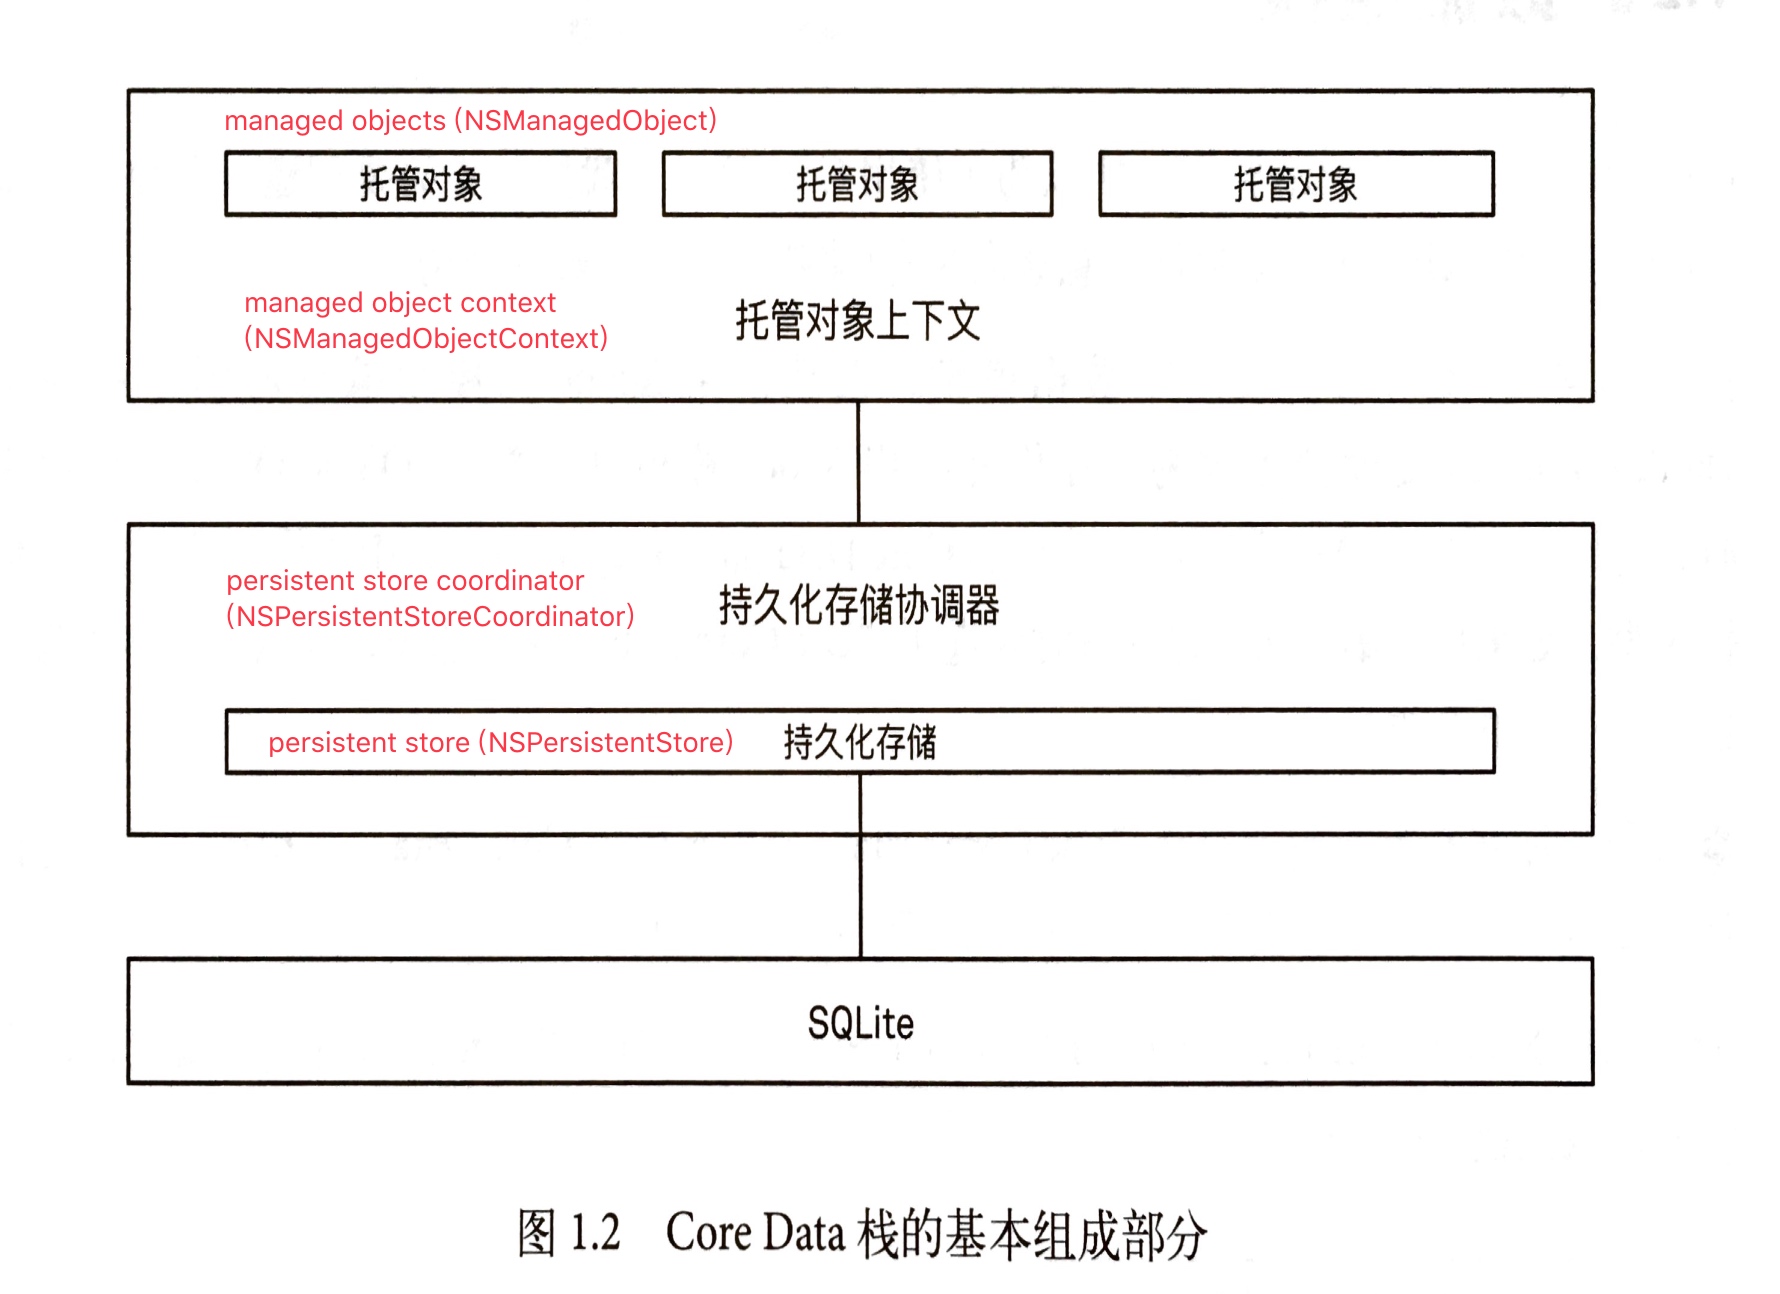
栈(Stack)由四个 Core Data 类组成:
NSManagedObjectModel
NSPersistentStore
NSPersistentStoreCoordinator
NSManagedObjectContext
清楚栈的工作是很有必要的,例如要从旧的数据库迁移数据。
下面是 objc 的《Core Data》中的一幅图,定义的有些不一样:
The persistent store
NSQLiteStoreType 依靠一个 SQLite 数据库,这是仅有的 non-atomic 的 Core Data 支持的,轻量级、有效率的储存。通常 Xcode 的 Core Data 默认模板就是用这个。NSXMLStoreType 依靠一个 XML 文件,这让它有很好的可读性。store type 是 atomic 的,所以他可以有大储存 footprint。只在 OS X 上可用。NSBinaryStoreType 依靠一个二进制文件,像 NSXMLStoreType ,它的 store type 也是是 atomic 的,所以二进制文件必须被读取进内存,之后才能使用它。你将很少看到这类型的 persistent store。NSInMemoryStoreType 是 in-memory persistent store type。某种程度上讲,这不是真的可持久的,终止应用或关掉手机,存储在内存中的数据就会消失,尽管这像是跟 Core Data 的目的背道而驰,但这 in-memory persistent stores 对单元测试和某些缓存有帮助。
The persistent store coordinator
NSPersistentStoreCoordinator 是 managed object model 和 persistent store 的桥梁。它理解 NSManagedObjectModel,也知道怎么去从 NSPersistentStore 传消息和获取消息。
NSPersistentStoreCoordinator 同时隐藏了实现 persistent store 或 stores 配置的细节,有两个原因:
NSManagedObjectContext 没必要知道怎么去保存到一个 SQLite 数据库、XML 文件或者一个定制增量存储(custom incremental store)。
如果你有多个 persistent stores,那么 persistent store coordinator 会提供一个统一的接口去管理 context。至于 context 的管理,它经常和一个单独的、聚合的 persistent store 交互。
The managed object context
日常使用中,你会经常使用 NSManagedObjectContext,可能只有在用 Core Data 使用一些更高级的功能时才会看到其他三个部分。
理解 context 如何工作也是很重要的:
一个 context 是一个 in-memory 暂存器用来处理你的 managed object。
你会用一个 managed object context 来做所有关于 Core Data objects 的事情。
只当你在 context 上调用save(),所有的改动才会影响到储存卡中的数据。
更重要的还有:
context 管理着创建 objects 或获得 objects 的生命周期。这生命周期的管理包含很强大的功能如挑错、逆关系处理(inverse relationship handling) 和校验数据。
一个 managed object 不能离开相关的 context 而存在。实际上,一个 managed object 和它的 context 是很紧密联系在一起的,每个 managed object 都会有一个它的 context 的引用,例如:let managedContext = employee.managedObjectContext
context 是区域性的。一旦一个 managed object 关联上一个特定的 context,它将会一直在它生命周期中关联同样的 context。
一个应用可以有多于一个 context。然而一个 context 是暂存在内存中的,你可以同时取出同样的 Core Data object 到两个不同的 context。
context 不是线程安全的 ,这同样适用于一个 managed object。你只能在它们被创建的相同的线程中使用 context 和 managed objects 。
The persistent store container
在 iOS 10 中,NSPersistentContainer 是一个新的类,它能管理所有四个 Core Data stack 类——the managed model, the store coordinator, the persistent store 和 managed context。
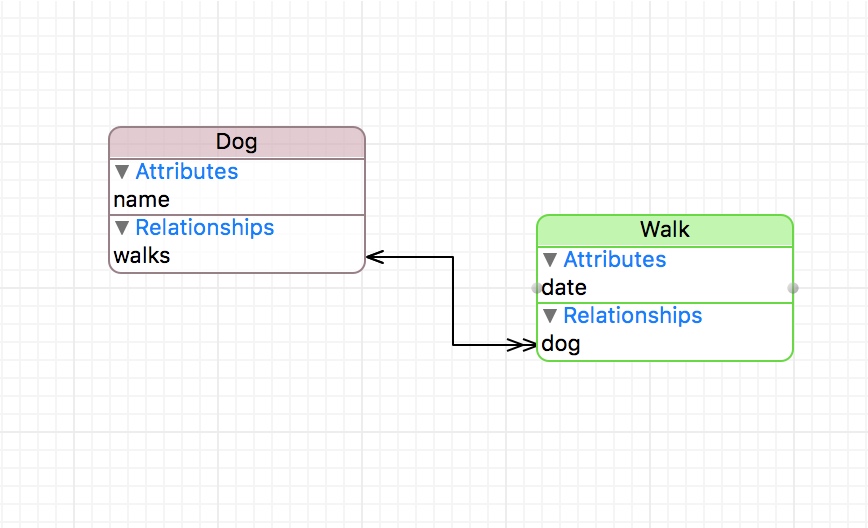
实例:遛狗
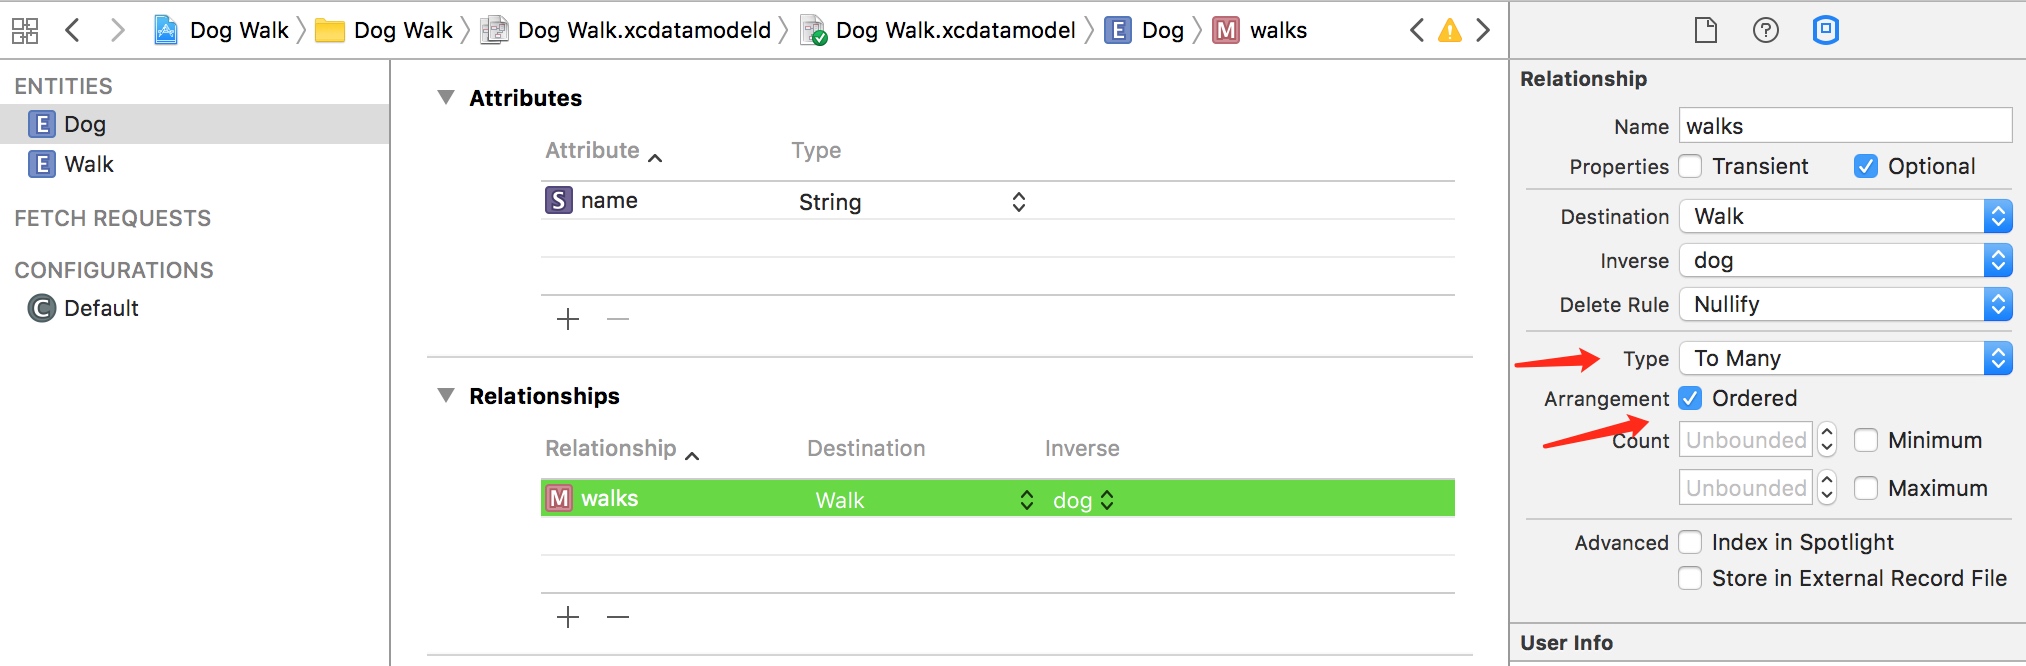
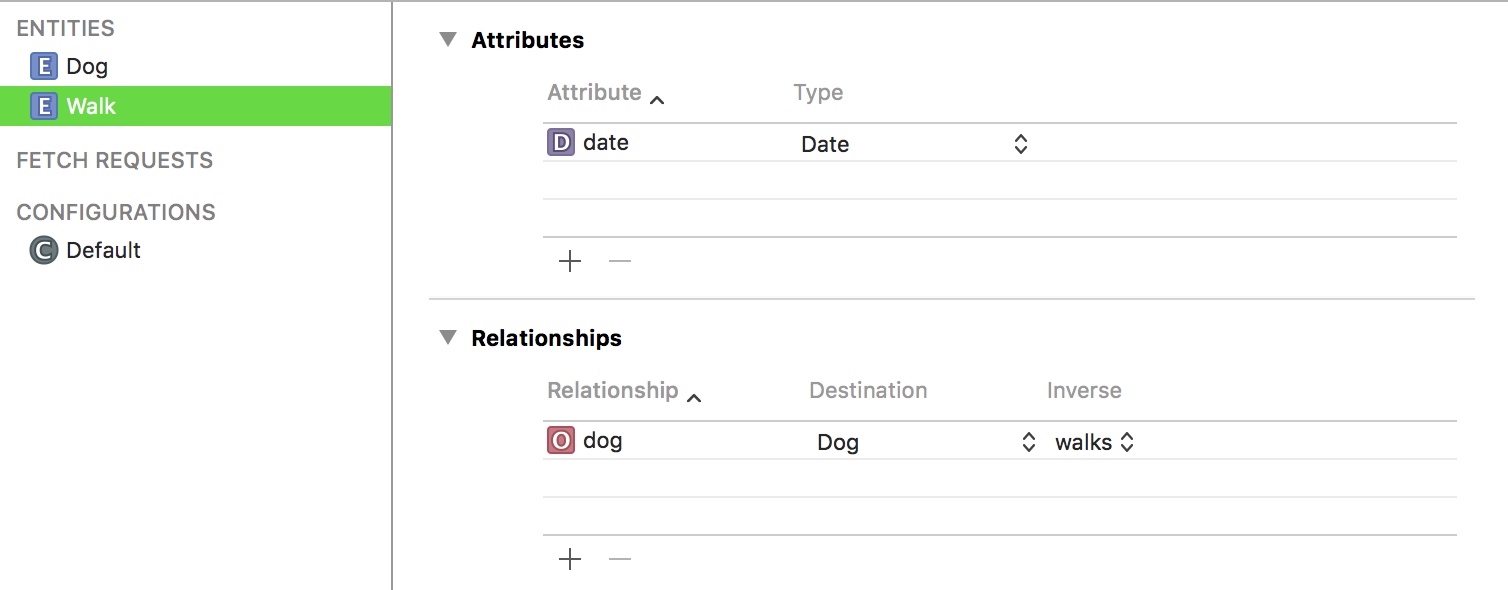
Dog Walk.xcdatamodeld
其中狗对遛狗这个行为是一对多的关系,而遛狗行为对狗而言是一对一的关系,如下图:
新建一个Core Data Stack
1
2
3
4
5
6
7
8
9
10
11
12
13
14
15
16
17
18
19
20
21
22
23
24
25
26
27
28
29
30
31
32
33
34
35
36
import Foundationimport CoreDataclass CoreDataStack { private let modelName: String init (modelName : String ) { self .modelName = modelName } lazy var managedContext: NSManagedObjectContext = { return self .storeContainer.viewContext }() private lazy var storeContainer: NSPersistentContainer = { let container = NSPersistentContainer (name: self .modelName) container.loadPersistentStores { (storeDescription, error) in if let error = error as NSError ? { print ("Unresolved error \(error) , \(error.userInfo) " ) } } return container }() func saveContext () { guard managedContext.hasChanges else { return } do { try managedContext.save() } catch let error as NSError { print ("Unresolved error \(error) , \(error.userInfo) " ) } } }
AppDelegate.swift
1
2
3
4
5
6
7
8
9
10
11
12
13
14
15
16
17
18
19
20
21
22
23
24
25
26
27
import UIKitimport CoreData@UIApplicationMain class AppDelegate : UIResponder , UIApplicationDelegate { var window: UIWindow ? lazy var coreDataStack = CoreDataStack (modelName: "Dog Walk" ) func application (_ application : UIApplication , didFinishLaunchingWithOptions launchOptions : [UIApplicationLaunchOptionsKey : Any ]? ) -> Bool { guard let navController = window? .rootViewController as? UINavigationController , let viewController = navController.topViewController as? ViewController else { return true } viewController.managedContext = coreDataStack.managedContext return true } func applicationDidEnterBackground (_ application : UIApplication ) { coreDataStack.saveContext() } func applicationWillTerminate (_ application : UIApplication ) { coreDataStack.saveContext() } }
ViewController.swift
1
2
3
4
5
6
7
8
9
10
11
12
13
14
15
16
17
18
19
20
21
22
23
24
25
26
27
28
29
30
31
32
33
34
35
36
37
38
39
40
41
42
43
44
45
46
47
48
49
50
51
52
53
54
55
56
57
58
59
60
61
62
63
64
65
66
67
68
69
70
71
72
73
74
75
76
77
78
79
80
81
82
83
84
85
86
87
88
89
90
91
92
93
94
95
96
97
98
99
100
101
102
103
104
105
106
107
108
109
110
111
112
113
114
115
116
import UIKitimport CoreDataclass ViewController : UIViewController { lazy var dateFormatter: DateFormatter = { let formatter = DateFormatter () formatter.dateStyle = .short formatter.timeStyle = .medium return formatter }() var currentDog: Dog ? var managedContext: NSManagedObjectContext ! @IBOutlet var tableView: UITableView ! override func viewDidLoad () { super .viewDidLoad() tableView.register(UITableViewCell .self , forCellReuseIdentifier: "Cell" ) let dogName = "Fido" let dogFetch: NSFetchRequest <Dog > = Dog .fetchRequest() dogFetch.predicate = NSPredicate (format: "%K == %@" , #keyPath (Dog .name), dogName) do { let results = try managedContext.fetch(dogFetch) if results.count > 0 { currentDog = results.first } else { currentDog = Dog (context: managedContext) currentDog? .name = dogName try managedContext.save() } } catch let error as NSError { print ("Fetch error: \(error) description: \(error.userInfo) " ) } } } extension ViewController { @IBAction func add (_ sender : UIBarButtonItem ) { let walk = Walk (context: managedContext) walk.date = NSDate () currentDog? .addToWalks(walk) do { try managedContext.save() } catch let error as NSError { print ("Save error: \(error) description: \(error.userInfo) " ) } tableView.reloadData() } } extension ViewController : UITableViewDataSource { func tableView (_ tableView : UITableView , numberOfRowsInSection section : Int ) -> Int { guard let walks = currentDog? .walks else { return 1 } return walks.count } func tableView (_ tableView : UITableView , cellForRowAt indexPath : IndexPath ) -> UITableViewCell { let cell = tableView.dequeueReusableCell(withIdentifier: "Cell" , for: indexPath) guard let walk = currentDog? .walks? [indexPath.row] as? Walk , let walkDate = walk.date as? Date else { return cell } cell.textLabel? .text = dateFormatter.string(from: walkDate) return cell } func tableView (_ tableView : UITableView , titleForHeaderInSection section : Int ) -> String ? { return "List of Walks" } } func tableView (_ tableView : UITableView , commit editingStyle : UITableViewCellEditingStyle , forRowAt indexPath : IndexPath ) { guard let walkToRemove = currentDog? .walks? [indexPath.row] as? Walk , editingStyle == .delete else { return } managedContext.delete(walkToRemove) do { try managedContext.save() tableView.deleteRows(at: [indexPath], with: .automatic) } catch let error as NSError { print ("Saving error: \(error) , description: \(error.userInfo) " ) } } func tableView (_ tableView : UITableView , canEditRowAt indexPath : IndexPath ) -> Bool { return true }
总结:CoreDataStack.swift可以看到,我们新建了个 Core Data Stack 来管理 context,其中 managed context 由初始化后的 NSPersistentContainer 类实例的 .viewContext 属性获取。另外AppDelegate.swift也用到CoreDataStack.swift中的saveContext()方法来保存数据变更。至此,我们完成通过 Stack 来对数据增删改查,第一阶段结束。
前面我们都是一下子获取所有搜索到的数据,这节讲的是如何更好地获取数据。
本节目标:
只获取想要的数据
用 predicate 限制获取到的数据
避免屏蔽 UI,转为在后台获取数据
在 persistent store 中通过直接更新 object 来避免不必要的数据获取。
NSFetchRequest
之前获取数据都是先创建一个 NSFetchRequest 实例,配置好搜索范围然后再在 context 上获取数据。但实际上,我们有五种不同的方法来实现操作。
1 2 3 4 5 6 7 8 9 10 11 12 13 14 15 16 let fetchRequest1 = NSFetchRequest <Venue >()let entity = NSEntityDescription .entity(forEntityName: "Venue" , in: managedContext)! fetchRequest1.entity = entity let fetchRequest2 = NSFetchRequest <Venue >(entityName: "Venue" )let fetchRequest3: NSFetchRequest <Venue > = Venue .fetchRequest()let fetchRequest4 = managedObjectModel.fetchRequestTemplate(forName: "venueFR" )let fetchRequest5 = managedObjectModel.fetchRequestFromTemplate(withName: "venueFR" , substitutionVariables: ["NAME" : "Vivi Bubble Tea" ])
获取不同结果的类型
NSFetchResult 不仅仅是一个简单的工具,实际上,它可以说是 Core Data 框架中的瑞士军刀。
你可以用它来获取单独的数据,对数据进行统计,例如:平均数、最小值、最大值等等。
NSFetchRequest 有个属性叫 resultType,
.managedObjectResultType:返回 managed objects(默认值)
.countResultType:返回满足抓取要求的数据数量
.dictionaryResultType:这是一个获取所有返回数据的类型,能返回经过不同计算后的数据。
.managedObjectIDResultType:代替完整的 managed object 返回唯一识别(unique identifiers)。
例如:获取其数量!
拿第二点 .countResultType 来说,有的人可能会直接获取所有的 managed objects 之后再调用数组的count属性得到 object 的数量。但是一旦要获取一个城市的人口数量的时候,先获取所有人口的 object 再得到数量这样显然对内存是很不友好的,这时候通过 .countResultType 获取结果的数量会更有效率。
例如,我想获得价格分类只有一个「$」的珍珠奶茶店数量,我们给 fetchRequest 配置好 resultType 结果类型属性,在配置好 predicate 查询范围后,就可以直接从 countResult.first!.intValue 得到。
1
2
3
4
5
6
7
8
9
10
11
12
13
14
15
16
17
18
19
20
21
22
23
24
25
var coreDataStack: CoreDataStack !lazy var cheapVenuePredicate: NSPredicate = { return NSPredicate (format: "%K == %@" , #keyPath (Venue .priceInfo.priceCategory), "$" ) }() func populateCheapVenueCountLabel () { let fetchRequest = NSFetchRequest <NSNumber >(entityName: "Venue" ) fetchRequest.resultType = .countResultType fetchRequest.predicate = cheapVenuePredicate do { let countResult = try coreDataStack.managedContext.fetch(fetchRequest) let count = countResult.first! .intValue firstPriceCategoryLabel.text = "\(count) bubble tea places" } catch let error as NSError { print ("Could not fetch \(error) , \(error.userInfo) " ) } }
当然我们还可以有不同的搜索数量的方式,这里我们获得价格分类有三个「$」的珍珠奶茶店数量。和以前一样先把搜索范围定位所有的 Venue object,然后在获取结果的时候点名只获取数量。
1
2
3
4
5
6
7
8
9
10
11
12
13
14
15
16
17
18
19
20
21
lazy var expensiveVenuePredicate: NSPredicate = { return NSPredicate (format: "%K == %@" , #keyPath (Venue .priceInfo.priceCategory), "$$$" ) }() func populateExpensiveVenueCountLabel () { let fetchRequest: NSFetchRequest <Venue > = Venue .fetchRequest() fetchRequest.predicate = expensiveVenuePredicate do { let count = try coreDataStack.managedContext.count(for: fetchRequest) thirdPriceCategoryLabel.text = "\(count) bubble tea places" } catch let error as NSError { print ("Could not fetch \(error) , \(error.userInfo) " ) } }
例如:获取后计算!
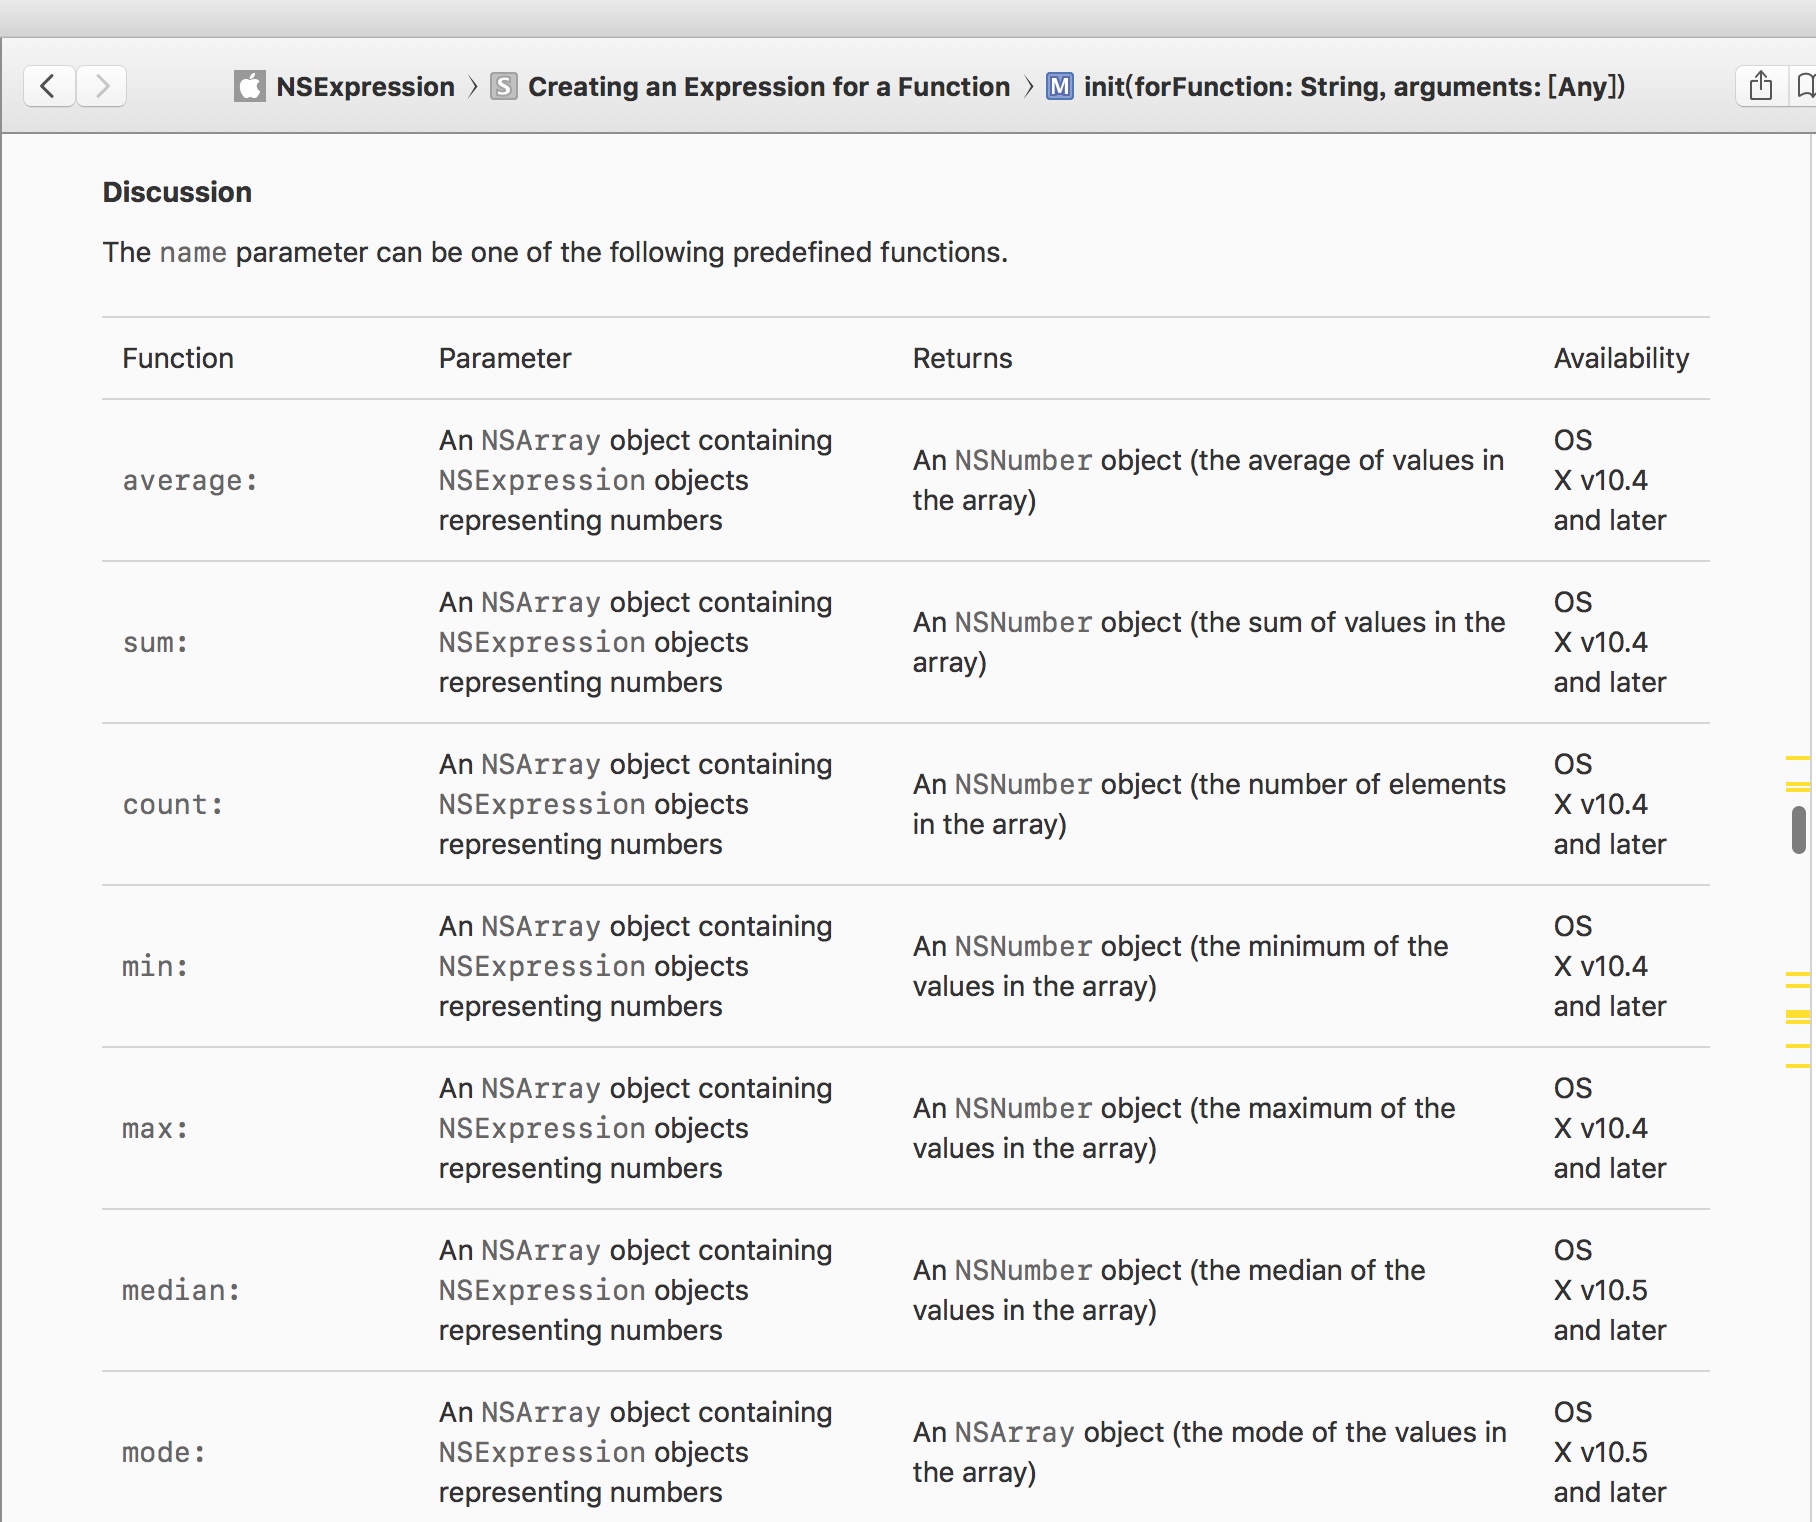
第三点的.dictionaryResultType 能能返回经过不同计算后的数据,同样的我们通过 NSExpression 来实现一些简单的计算。下图是 API 文档中的部分属性,供参考。
例如,我们要搜索所有珍珠奶茶的优惠数量,我们同样没有必要找出所有相关的属性再自己求和,Core Data 可以帮我们完成任务。
1
2
3
4
5
6
7
8
9
10
11
12
13
14
15
16
17
18
19
20
21
22
23
24
25
26
27
28
29
func populateDealsCountLabel () { let fetchRequest = NSFetchRequest <NSDictionary >(entityName: "Venue" ) fetchRequest.resultType = .dictionaryResultType let sumExpressionDesc = NSExpressionDescription () sumExpressionDesc.name = "sumDeals" let specialCountExp = NSExpression (forKeyPath: #keyPath (Venue .specialCount)) sumExpressionDesc.expression = NSExpression (forFunction: "sum:" , arguments: [specialCountExp]) sumExpressionDesc.expressionResultType = .integer32AttributeType fetchRequest.propertiesToFetch = [sumExpressionDesc] do { let results = try coreDataStack.managedContext.fetch(fetchRequest) let resultDict = results.first! let numDeals = resultDict["sumDeals" ]! numDealsLabel.text = "\(numDeals) total deals" } catch let error as NSError { print ("Could not fetch \(error) , \(error.userInfo) " ) } }
managedObjectResultType
剩下一个类型是.managedObjectResultType,当你用这类型去获取结果的时候,结果会是一个NSManagedObjectID组成的数组,而不是原来的 managed objects。一个NSManagedObjectID是一个managed object 的压缩的统一标识,作用就像数据库中的主键一样。
在 iOS 5,人们通常通过 ID 来获取数据,因为NSManagedObjectID是线程安全的,而且通过用它能帮助开发者实现并发线程限制模型(thread confinement concurrency model)。
现在线程限制对于很多并发模型来说已经过时了,通过 object ID 来获取数据的做法也在逐渐减少。
目前我们尝试过关于获取数据的不同方式,但是有时候我们需要限制获取的数据数量,我们有时没有必要去一次性获取所有对象图(object graph),这样对内存也不友好。
我们有不同方式去限制获取结果的数量,例如NSFetchRequest支持获取的批次数量 (fetching batches)。我们可以用fetchBatchSize、fetchLimit、fetchOffset去控制获取批次数量的行为。
1
2
3
4
5
let request = NSFetchRequest (entityName: "Item" )request.fetchBatchSize = 20 request.fetchLimit = 100 request.sortDescriptors = [sortDescriptor] request.predicate = ...
例如数据库有1000个「item」,上面的代码限制了请求,一次获取20个 item,并且将会在获取100个 item 之后停止继续获取数据。
Core Data 也尝试通过一种名叫「faulting 」的技术去减少内存消耗,一个 fault 是一个占位符,用来表示 managed object 没有被完全送进内存里面。
最后,限制对象图的另外一种方法是用 predicates,就像之前做的一样。
Faulting
Faulting 可以看做是 Core Data 的一种懒加载,简单地说就是 object 的一些属性只会在你需要的时候才会去获取。
1
2
3
for user in twitterUsers { print ("fetched user \(user) " ) }
我们可能看不到 user 的 name 属性被打印出来(我们可能只会看到「unfaulted object」,这依赖于 Core Data 是否已经提前获取了属性),但如果我们像下面这么做…
1
2
3
for user in twitterUsers { print ("fetched user named \(user.name) " ) }
我们一定能够从数据库中获取所有的 TwitterUsers,因为我们实际上在获取 NSManagedObject 的数据(其属性)。
排序
NSFetchRequest 另外一个强大的功能就是能帮你排序好数据,它是通过 NSSortDescriptor 来实现的。这样的排序是在 SQLite 层面的,而不是在内存中,所以这让 Core Data 中的排序即快又有效率。
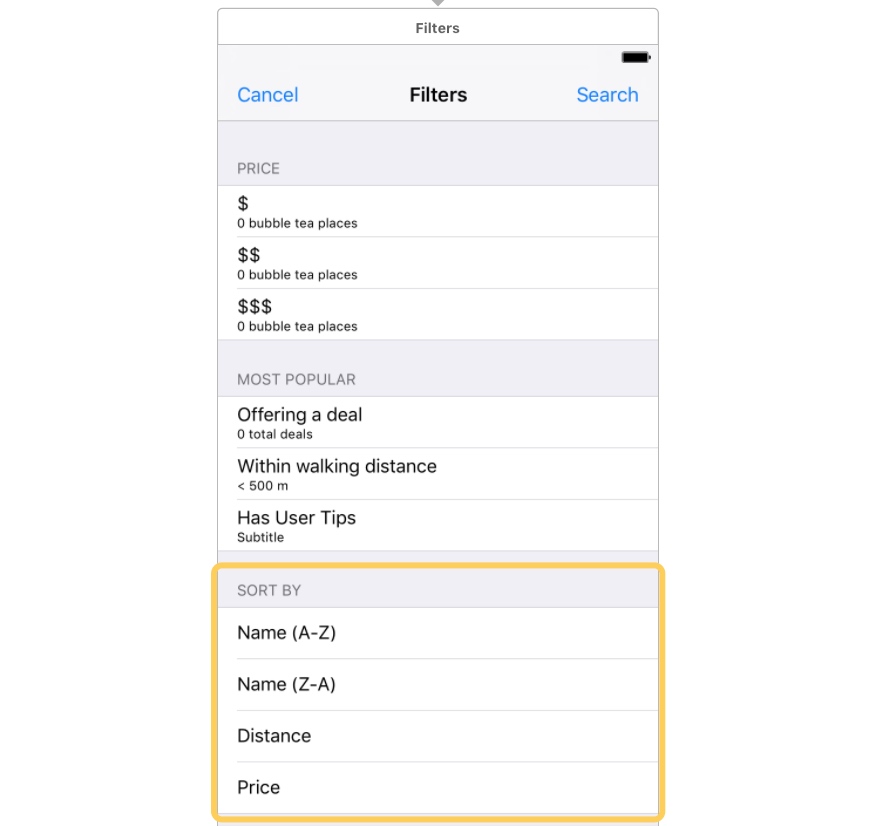
现在要实现根据珍珠奶茶店的名字升序、降序、距离、价格来排序,首先定义好 NSSortDescriptor。
1 2 3 4 5 6 7 8 9 10 11 12 13 14 15 16 17 18 19 lazy var nameSortDescriptor: NSSortDescriptor = { let compareSelector = #selector (NSString .localizedStandardCompare(_ :)) return NSSortDescriptor (key: #keyPath (Venue .name), ascending: true , selector: compareSelector) }() lazy var distanceSortDescriptor: NSSortDescriptor = { return NSSortDescriptor (key: #keyPath (Venue .location.distance), ascending: true ) }() lazy var priceSortDescriptor: NSSortDescriptor = { return NSSortDescriptor (key: #keyPath (Venue .priceInfo.priceCategory), ascending: true ) }()
初始化一个 NSSortDescriptor 的实例需要做三件事:有一个 key path 去指出要排序的属性路径(数据库表中:表→属性,表→表→属性等等),要求升序或降序, 一个可选的选择器(option selector)去实现比较操作。
如果你之前用过 NSSortDescriptor,你可能知道有一种基于块的(block-based) API 可以把比较器(comparator)代替为选择器(seletor)。遗憾的是,Core Data 不支持通过这种方法来定义一个 sort descriptor。
同样的 Core Data 也不支持 NSPredicate 中基于块的(block-based)方法,原因是过滤和分类操作是在 SQLite 数据库中完成的,所以 predicate/sort descriptor 不得不去很好的匹配数据并写成 SQLite 语句。
另外,NSString.localizedStandardCompare(_:) 是苹果推荐用来根据符合当前语言环境(the current locale)的语言规则来排序,这可以更好地去处理一些特殊字符,例如 bien sûr :]
在tableView(didSelectRowAt:)方法中完成赋值,「Search」按钮事件为触发ViewController.swift中的委托方法。
FilterViewController.swift
1 2 3 4 5 6 7 8 9 10 11 12 13 14 15 16 17 18 19 20 21 22 23 24 25 26 27 28 29 30 31 32 33 34 35 36 37 38 39 40 41 42 43 44 45 46 47 48 49 50 protocol FilterViewControllerDelegate : class { func filterViewController (filter : FilterViewController , didSelectPredicate predicate : NSPredicate ?, sortDescriptor : NSSortDescriptor ?) } class FilterViewController : UITableViewController {} extension FilterViewController { override func tableView (_ tableView : UITableView , didSelectRowAt indexPath : IndexPath ) { guard let cell = tableView.cellForRow(at: indexPath) else { return } switch cell { case nameAZSortCell: selectedSortDescriptor = nameSortDescriptor case nameZASortCell: selectedSortDescriptor = nameSortDescriptor.reversedSortDescriptor as? NSSortDescriptor case distanceSortCell: selectedSortDescriptor = distanceSortDescriptor case priceSortCell: selectedSortDescriptor = priceSortDescriptor default : break } cell.accessoryType = .checkmark } } extension FilterViewController { @IBAction func saveButtonTapped (_ sender : UIBarButtonItem ) { delegate? .filterViewController(filter: self , didSelectPredicate: selectedPredicate, sortDescriptor: selectedSortDescriptor) dismiss(animated: true ) } }
ViewController.swift 中补充委托方法。
1 2 3 4 5 6 7 8 9 10 11 12 13 14 15 extension ViewController : FilterViewControllerDelegate { func filterViewController (filter : FilterViewController , didSelectPredicate predicate : NSPredicate ?, sortDescriptor : NSSortDescriptor ?) { fetchRequest.predicate = nil fetchRequest.sortDescriptors = nil fetchRequest.predicate = predicate if let sr = sortDescriptor { fetchRequest.sortDescriptors = [sr] } fetchAndReload() } }
异步获取数据
当你看到这里,我好消息和坏消息要告诉你。好消息是我们已经说了很多关于 NSFetchRequest 可以做的事,坏消息是我们每次获取数据都会屏蔽主线程,直到获取到数据。
当你屏蔽了主线程,屏幕就会变得不可交互,还会产生一些其他的问题,之前没有感觉到屏蔽主线程的感觉,是因为我们获取的数据还太少。iOS 8 中,Core Data 有一个 API 能让我们长时间在后台获取数据,获取到数据后还能得到一个回调方法。
1 2 3 4 5 6 7 8 9 10 11 12 13 14 15 16 17 18 19 20 21 22 23 24 25 26 27 28 29 30 var venues: [Venue ] = []var asyncFetchRequest: NSAsynchronousFetchRequest <Venue >!override func viewDidLoad () { super .viewDidLoad() fetchRequest = Venue .fetchRequest() asyncFetchRequest = NSAsynchronousFetchRequest <Venue >(fetchRequest: fetchRequest) { [unowned self ] (result: NSAsynchronousFetchResult ) in guard let venues = result.finalResult else { return } self .venues = venues self .tableView.reloadData() } do { try coreDataStack.managedContext.execute(asyncFetchRequest) } catch let error as NSError { print ("Could not fetch \(error) , \(error.userInfo) " ) } }
还要注意的是要获取的 venues 实例,由于现在获取数据是异步的,所以获取数据的步骤会在 table view 初始化之后再执行,所以要先初始化好实例,不然不能解包实例,应用会报错。
另外,如果要取消获取数据的请求(fetch request),可以调用NSAsynchronousFetchResult的cancel()方法。
批量更新(Batch updates)
有时候我们需要从 Core Data 中获取数据是去改变一个单独的属性(attribute),改动后,我们还要去 commit 回 persistent store。但如果我们想要去一次性更新十万计的数据呢?这将会消耗大量的时间和内存去只更新一个属性。
iOS 8 中,有一个新的方法能不从内存中获取所有数据来完成更新数据:batch updates。这新的技术能绕过 NSManagedObjectContext 来直接操作 persistent store。通常批量更新的做法就像邮件客户端中的「Mark all as read」功能一样。
1 2 3 4 5 6 7 8 9 10 11 12 13 14 15 16 17 18 19 20 override func viewDidLoad () { super .viewDidLoad() let batchUpdate = NSBatchUpdateRequest (entityName: "Venue" ) batchUpdate.propertiesToUpdate = [#keyPath (Venue .favorite) : true ] batchUpdate.affectedStores = coreDataStack.managedContext .persistentStoreCoordinator? .persistentStores batchUpdate.resultType = .updatedObjectsCountResultType do { let batchResult = try coreDataStack.managedContext .execute(batchUpdate) as! NSBatchUpdateResult print ("Records updated \(batchResult.result! ) " ) } catch let error as NSError { print ("Could not fetch \(error) , \(error.userInfo) " ) } }
运行应用后显示:Records updated 30
批量删除
iOS 9 中,NSBatchDeleteRequest 能帮我批量删除数据,如批量更新一样,不需要把数据读取到内存再操作,而且父类也是 NSPersistentStoreRequest。
我们在回避 NSManagedObjectContext,所以批量更新或批量删除时,我们不会进行数据验证。数据的改动不会影响我们的 managed context,所以在用一个 persistent store request 之前要验证好数据。
NSFetchedResultsController
之前我们都是把 Core Data 和 UITableView 放在一起用,Core Data,提供了一个类来专门处理这种使用方式:NSFetchedResultsController。NSFetchedResultsController 是一个 controller,但是它不是一个 view controller,它没有界面,它的目的在于帮助开发者通过抽象大部分代码更容易地在 table view 上同步数据。
实例:世界杯
下面的代码是关于一个世界杯胜场计数的应用示例。
1
2
3
4
5
6
7
8
9
10
11
12
13
14
15
16
17
18
19
20
21
22
var fetchedResultsController: NSFetchedResultsController <Team >!override func viewDidLoad () { super .viewDidLoad() let fetchRequest: NSFetchRequest <Team > = Team .fetchRequest() fetchedResultsController = NSFetchedResultsController ( fetchRequest: fetchRequest, managedObjectContext: coreDataStack.managedContext, sectionNameKeyPath: nil , cacheName: nil ) do { try fetchedResultsController.performFetch() } catch let error as NSError { print ("Fetching error: \(error) , \(error.userInfo) " ) } }
这里有点奇怪的是 NSFetchedResultsController 没有返回什么值就可以获取数据了,其实 NSFetchedResultsController 既是 fetch request 的包装,也是一个获取数据用的 container,我们可以从中获取到数据。例如我们可以通过fetchedObject属性或object(at:)方法来获得。
1 2 3 4 5 6 7 8 9 10 11 12 13 14 15 16 17 18 19 20 21 22 23 24 25 26 27 28 29 30 31 32 33 34 35 36 37 38 39 40 41 42 43 44 45 46 47 48 49 50 51 52 extension ViewController { func configure (cell : UITableViewCell , for indexPath : IndexPath ) { guard let cell = cell as? TeamCell else { return } let team = fetchedResultsController.object(at: indexPath) cell.flagImageView.image = UIImage (named: team.imageName! ) cell.teamLabel.text = team.teamName cell.scoreLabel.text = "Wins: \(team.wins) " } } extension ViewController : UITableViewDataSource { func numberOfSections (in tableView : UITableView ) -> Int { guard let sections = fetchedResultsController.sections else { return 0 } return sections.count } func tableView (_ tableView : UITableView , numberOfRowsInSection section : Int ) -> Int { guard let sectionInfo = fetchedResultsController.sections? [section] else { return 0 } return sectionInfo.numberOfObjects } func tableView (_ tableView : UITableView , cellForRowAt indexPath : IndexPath ) -> UITableViewCell { let cell = tableView.dequeueReusableCell(withIdentifier: teamCellIdentifier, for: indexPath) configure(cell: cell, for: indexPath) return cell } } extension ViewController : UITableViewDelegate { func tableView (_ tableView : UITableView , didSelectRowAt indexPath : IndexPath ) { let team = fetchedResultsController.object(at: indexPath) team.wins = team.wins + 1 coreDataStack.saveContext() tableView.reloadData() } }
section
到了这步,启动应用的话还会报'An instance of NSFetchedResultsController requires a fetch request with sort descriptors'的错,因为我们使用 NSFetchedResultsController,它需要我们给它提供至少一个 sort descriptor,才能知道如何整理数据。与之前不一样的是,前面获取数据的时候可以不提供 sort descriptor。
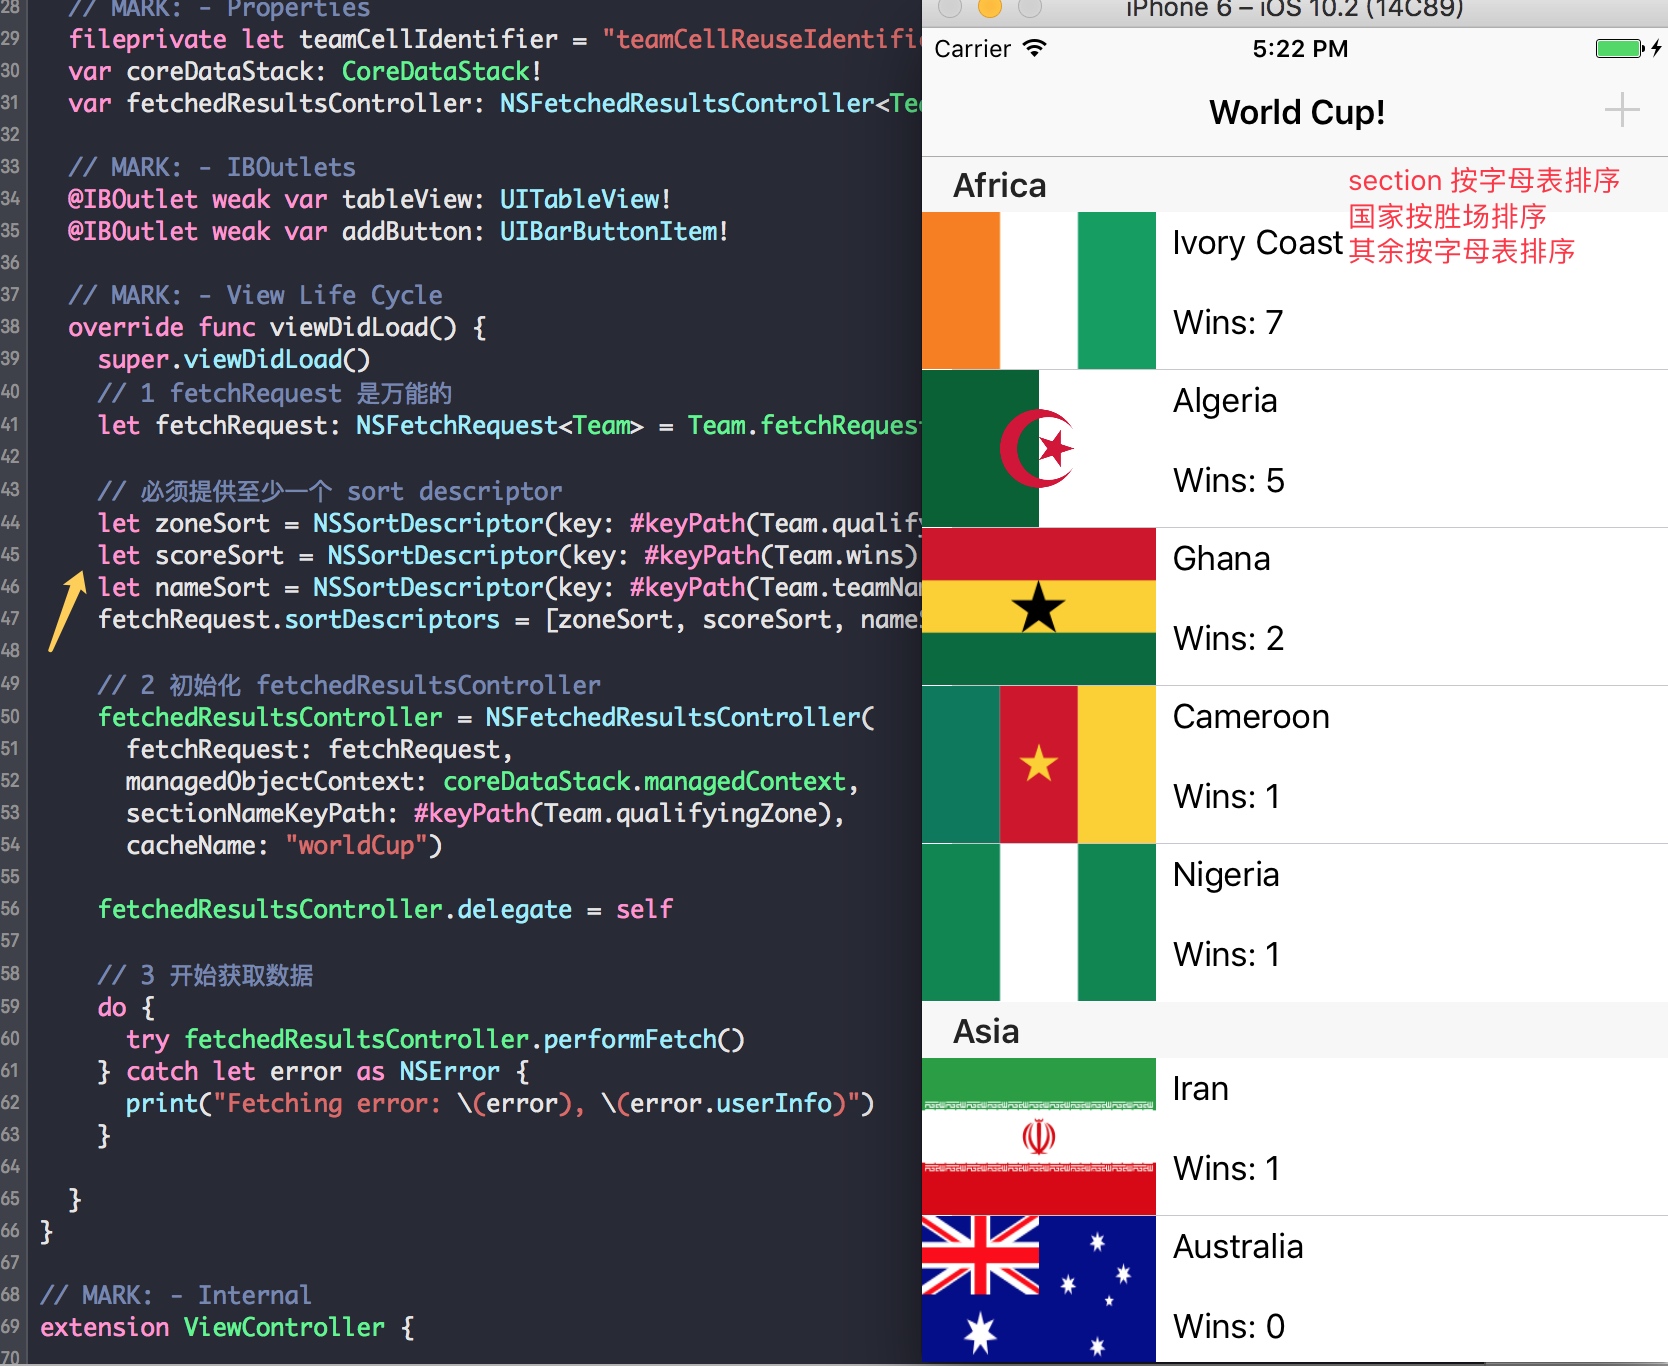
于是在之前的基础上加上 sort descriptor,这里同时增加了三种排序。
1 2 3 4 5 6 7 8 9 10 11 12 13 14 15 16 17 18 19 20 21 22 23 24 25 26 override func viewDidLoad () { super .viewDidLoad() let fetchRequest: NSFetchRequest <Team > = Team .fetchRequest() let zoneSort = NSSortDescriptor (key: #keyPath (Team .qualifyingZone), ascending: true ) let scoreSort = NSSortDescriptor (key: #keyPath (Team .wins), ascending: false ) let nameSort = NSSortDescriptor (key: #keyPath (Team .teamName), ascending: true ) fetchRequest.sortDescriptors = [zoneSort, scoreSort, nameSort] fetchedResultsController = NSFetchedResultsController ( fetchRequest: fetchRequest, managedObjectContext: coreDataStack.managedContext, sectionNameKeyPath: nil , cacheName: nil ) do { try fetchedResultsController.performFetch() } catch let error as NSError { print ("Fetching error: \(error) , \(error.userInfo) " ) } }
如果在前面viewDidLoad()方法中更改下 fetchedResultsController 的 sectionNameKeyPath,就可以直接按照相关的字符串分类,例如这里把国家按照大洲分类。注意前面的 sort descriptor 也要加上相应的分类,例如let zoneSort = NSSortDescriptor(key: #keyPath(Team.qualifyingZone), ascending: true),否则分类顺序会错乱。
1 2 3 4 5 6 fetchedResultsController = NSFetchedResultsController ( fetchRequest: fetchRequest, managedObjectContext: coreDataStack.managedContext, sectionNameKeyPath: #keyPath (Team .qualifyingZone), cacheName: nil )
再增加一个委托方法提供 section 的标题:
1
2
3
4
func tableView (_ tableView : UITableView , titleForHeaderInSection section : Int ) -> String ? { let sectionInfo = fetchedResultsController.sections? [section] return sectionInfo? .name }
缓存
NSFetchedResultsController 提供了缓存功能,只要在之前的viewDidLoad()方法中更改下fetchedResultsController的 cacheName 就能实现了。
1
2
3
4
5
fetchedResultsController = NSFetchedResultsController ( fetchRequest: fetchRequest, managedObjectContext: coreDataStack.managedContext, sectionNameKeyPath: #keyPath (Team .qualifyingZone), cacheName: "worldCup" )
我们要注意缓存是把数据缓存到硬盘中,和 Core Data 的 persistent store 是分开的。如果我们要更改获取的数据,或者不一样的 sort descriptor 等等导致缓存无效的时候,我们必须用deleteCache(withName:)删除现有缓存,或者换一个缓存名。
数据控制
前面更新数据的方法就是调用 table view 的reloadData()方法,其实 NSFetchedResultsController 直接给我们提供了委托方法,让我们可以在数据改动的时候直接更新 table view。
1 2 3 4 5 6 7 8 9 10 11 12 13 14 15 16 17 18 19 20 21 22 23 24 25 26 27 28 29 30 31 32 33 34 35 36 37 38 39 40 41 extension ViewController : NSFetchedResultsControllerDelegate { func controllerWillChangeContent (_ controller : NSFetchedResultsController <NSFetchRequestResult >) { tableView.beginUpdates() } func controller (_ controller : NSFetchedResultsController <NSFetchRequestResult >, didChange anObject : Any , at indexPath : IndexPath ?, for type : NSFetchedResultsChangeType , newIndexPath : IndexPath ?) { switch type { case .insert: tableView.insertRows(at: [newIndexPath! ], with: .automatic) case .delete: tableView.deleteRows(at: [indexPath! ], with: .automatic) case .update: let cell = tableView.cellForRow(at: indexPath! ) as! TeamCell configure(cell: cell, for: indexPath! ) case .move: tableView.deleteRows(at: [indexPath! ], with: .automatic) tableView.insertRows(at: [newIndexPath! ], with: .automatic) } } func controllerDidChangeContent (_ controller : NSFetchedResultsController <NSFetchRequestResult >) { tableView.endUpdates() } func controller (_ controller : NSFetchedResultsController <NSFetchRequestResult >, didChange sectionInfo : NSFetchedResultsSectionInfo , atSectionIndex sectionIndex : Int , for type : NSFetchedResultsChangeType ) { let indexSet = IndexSet (integer: sectionIndex) switch type { case .insert: tableView.insertSections(indexSet, with: .automatic) case .delete: tableView.deleteSections(indexSet, with: .automatic) default : break } } }
未完待续
Todo:
多线程
数据库迁移
Optimistic locking (deleteConflictsForObject)
Rolling back unsaved changes
Undo/Redo
Staleness (how long after a fetch until a refetch of an object is required?)
…
如同上面的列表所示,本文没涉及的话题还很多,但会随着自己的学习逐渐补充。如何去保持 Core Data 高性能的最佳实践,如何正确地组合使用它,是使用 Core Data 的挑战所在。


 wechat
 alipay